For Photographers

Portfolio Series

Add a comment...

Your email is never published or shared. Required fields are marked *

What are the best lenses for wedding photography?

One the most frequently asked questions I get asked about wedding photography by other photographers is “What are the best lenses for wedding photography?”. It’s a question that comes up time and a time again on forums, too. With my dealings on various social networking sites, I often see comments like “I’m rocking the 35/85 combo today” and it got me thinking.

I am a big advocate of prime lenses. Are they the best lenses for wedding photography? For me, yes. As well as sporting wider apertures for shooting in low light, they are generally smaller, lighter and sharper than their zoom counterparts. Prime lenses make me think more about the shot and they make me work a little bit harder which, I believe, is making me a better photographer. I’m not suggesting you can’t use zoom lenses to photograph a wedding well. Of course you can. Zooms offer convenience and I see great work every day by great photographers using zooms. This isn’t a ‘zooms vs primes’ debate as such but prime lenses are what I use and prime lenses are what interest me personally.

In the interest of exploring the question “What are the best lenses for wedding photography?” I decided to pose a question on Twitter, Facebook and Google+, ” What is the most popular 2 prime lens setup?”.

Here are the results:

24mm and 35mm: 3%
24mm and 50mm: 18%
24mm and 85mm: 3%
28mm and 50mm: 3%
28mm and 85mm: 3%
35mm and 50mm: 15%
35mm and 85mm: 49%
35mm and 135mm: 3%
50mm and 85mm: 3% 

So it seems the 35mm and 85mm combo is by far the most popular 2 prime lens setup for wedding photography. Why did I pick 2 lenses for this question? Well it’s no coincidence that wedding photographers using prime lenses generally work with 2 bodies at the same time. Usually one body has a wider focal length attached and one has a longer focal length. This avoids the need for the photographer to switch lenses and risk missing a shot during important moments of the day.

For any newcomers to photography interested in establishing your own style, I thoroughly recommend you stick to just one or two focal lengths and use them over and over and over until you start to ‘see’ the shot in that focal length before even raising camera to eye.

Personally I use a 24mm f/1.4, 50mm f/1.2, 85mm f/1.8 and 135mm f/2 throughout the day. All these lenses offer wide apertures which is essential for my style as I often shoot in low light and almost exclusively by available light.

The 2 lenses that I use for probably 80% of the day are my 24mm and 50mm.

These are my go to lenses and I have built my style around them. I love context within my photography and the 24mm allows me to include this in abundance. Then there’s the 50mm, the classic photojournalists lens. For me and my style, these are the best lenses for wedding photography. Your mileage will almost certainly vary, which has been proven with the results of my recent poll. Ultimately, the best lenses are the ones that work best for you and your own style. Please feel free to continue the discussion in the comments below and also share this post via Twitter, Facebook or Google+.

Add a comment...

Your email is never published or shared. Required fields are marked *

Storage and Backup Workflow for Digital Photographers

As a professional documentary wedding photographer, I deal with thousands of digital images. From the bridal preparations to the evening celebrations, a couple’s entire day is documented and stored on a few tiny memory cards. The storage and backup of these images is of vital importance to me and my clients. The simple fact is that hard drives fail. It would be unthinkable to tell a couple they couldn’t have their wedding album because the hard drive failed and I lost all their irreplaceable photos.

The safeguarding of a couple’s wedding photos begins before I have even taken a picture. I only use professional grade memory cards by a leading manufacturer, Lexar. These are formatted the evening before the wedding and inserted face up in my Think Tank Pixel Pocket Rocket™.

I always carry two cameras, each with a different lens, and all the important parts of the day are covered with both cameras. This reduces the risk of important images being lost as a result of memory card failure, as they are always split across two cameras and two separate memory cards.

Full memory cards are turned face down and placed back in my memory card holder, which never leaves my sight. I never format a card on the day (as I said, all my cards are pre-formatted the night before) and I never delete images in-camera to further reduce the risk of losing any important images.

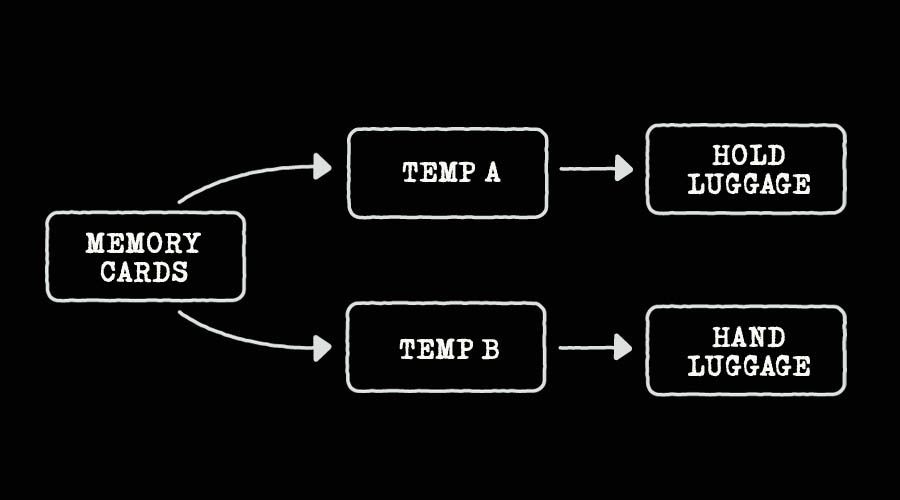
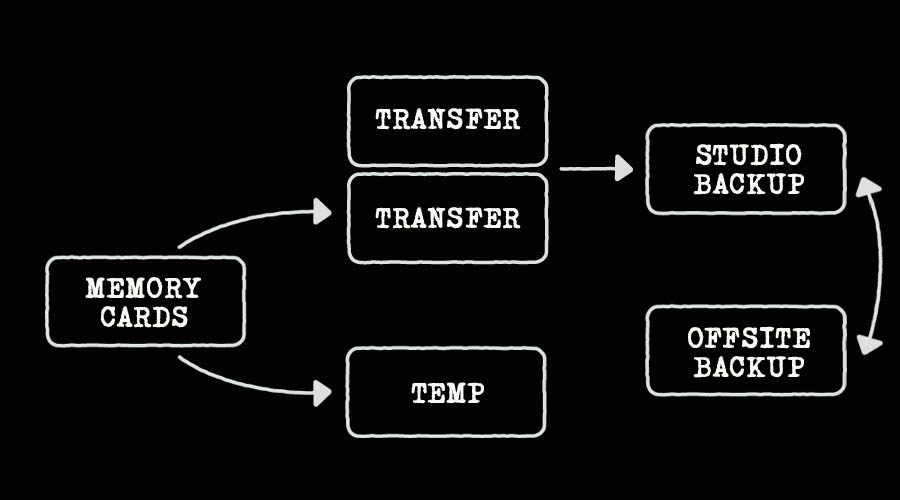
Once I’m home from the wedding I download an identical copy of all my cards to my TRANSFER drive (which is a mirrored RAID-1 drive) and to a separate portable TEMP drive which I carry with me until I have a sufficient offsite backup.

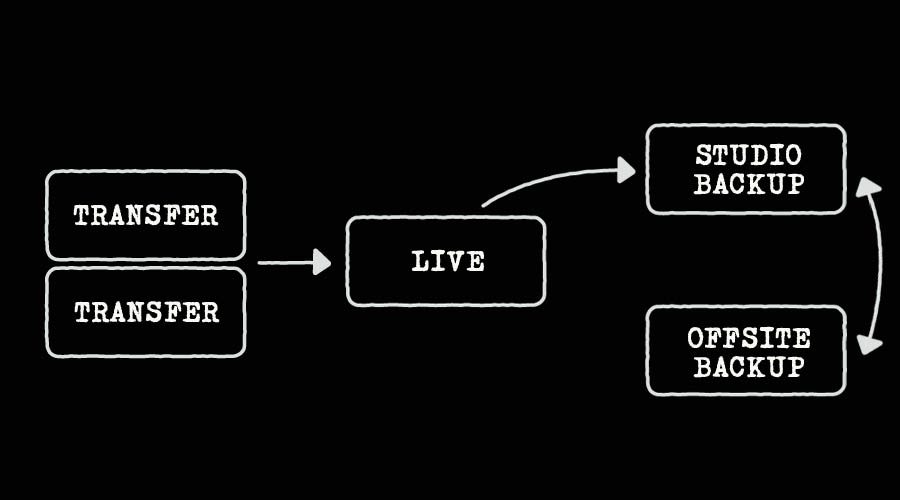
I copy my TRANSFER drive to my BACKUP drive using an extension called Déjà Vu. My BACKUP drive is then taken offsite and rotated with another identical BACKUP drive which I bring back to the studio. This step is vital in protecting against theft, fire and flood etc as it means I always have a copy of the photos safely stored offsite. Next I back up everything again to the BACKUP drive I just brought back to the studio.

This now gives me 5 copies of the digital negatives each on a separate hard drive, plus the original files still on the memory cards.

storage and backup workflow for digital photographers

If I am staying overnight or out of the country shooting a destination wedding I will carry a laptop with me instead and download an identical copy of all my cards to two separate portable TEMP drives. One of these will stay in my hotel and one will stay with me at all times. If I’m flying home one drive will be in my suitcase and one will be stored in my hand luggage. I am even considering the option of shipping one of these TEMP drives home via an international postal service for added protection.

storage and backup workflow for digital photographers

Next I use a program called PhotoMechanic to make my selects, and then copy these files from TRANSFER to my LIVE drive. LIVE is then backed up. The files on my LIVE drive are then imported into Adobe Lightroom ready for processing. Backups of live work are performed every day and every seven days this BACKUP drive will be rotated with my offsite BACKUP drive.

storage and backup workflow for digital photographers

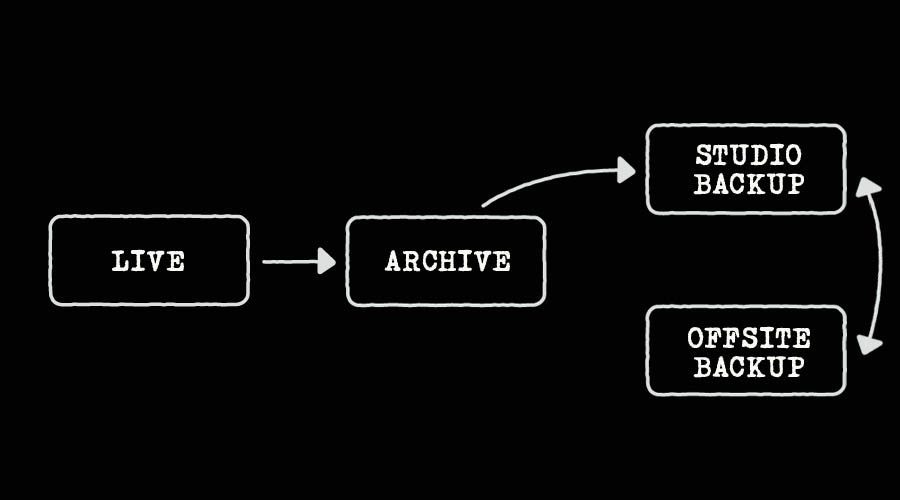
Once a shoot is processed and the images and albums have been delivered to the couple, the finished files get moved to my ARCHIVE drive which is then backed up. Again, every seven days this BACKUP drive will be rotated with my offsite BACKUP drive (are you seeing a pattern here?).

storage and backup workflow for digital photographers

This system is quite time intensive. Some my say it’s overkill but it gives me the peace of mind of knowing that I have multiple copies of a couples precious wedding photos safely stored on various hard drives and in various locations. Something my clients would be grateful for I am sure.

The drives I use:

TRANSFER drive – Lacie 2Big Quadra (RAID-1) partition

LIVE drive – Lacie 2Big Quadra (RAID-0) partition

ARCHIVE drive – Lacie D2 Quadra

BACKUP drives – 2 x Western Digital MyBook Studio

TEMP drives – 2 x Lacie Little Big Disks (RAID-0)

What is your storage and backup workflow?

If you have a similar storage and backup workflow or perhaps something different entirely I would love to hear about it.

Add a comment...

Your email is never published or shared. Required fields are marked *

Highlight and Shadow Recovery in Adobe Lightroom 5

As an available light wedding photographer, I often find myself dealing with high contrast situations. Usually the Bride will be dressed in white and the Groom dressed in black, and I will often find that the top table has been conveniently positioned in front of a large Georgian window, throwing the couple into nothing more than silhouettes without correct exposure correction. So throughout the course of a wedding day, it can often be challenging for a camera to record both details in the highlights and in the shadow areas within the same scene, especially without resorting to flash photography.

I overcome this both in the way I expose my shots, and the way I process my RAW files.

I mostly meter for the face, allowing the camera to overexpose slightly. This lifts the shadow areas (which is the area where most camera noise will be present) but in doing so it can burn out much of the highlight detail, the details of the dress for example. When processing in Adobe Lightroom I use the Highlight Recovery slider to make any global adjustments to the highlight areas, but I’m always careful with this as overuse can make the image look flat and dull.

I then use my custom Highlight Recovery Adjustment Brush to ‘paint’ back in selected highlight detail. Using a soft brush with a low opacity I ‘build’ the highlight details, going over and over areas until I have recovered sufficient detail.

Highlight and shadow recovery in Adobe Lightroom 5Highlight and shadow recovery in Adobe Lightroom 5

Here are the settings for my custom Highlight Recovery brush

Exposure -1.00
Contrast 15
Highlights -60
Shadows 0
Clarity 10
Saturation 0

Then, any shadow areas that require a lift are treated in the same way using the custom Shadow Recovery Adjustment Brush. Be careful with your shadows though, as it’s incredibly easy to introduce noise into your image by brightening them.

Here are the settings for my custom Shadow Recovery brush

Exposure 2.00
Contrast 20
Highlights 0
Shadows 35
Clarity 35
Saturation 0

I hope you found this useful.

Add a comment...

Your email is never published or shared. Required fields are marked *

Realistic Film Grain in Photoshop

My first real camera was a Nikon FE. I had 2 lenses, a 50mm prime and a 35-70mm zoom. I never really used the zoom. I loved that camera. I almost always shot slide film for my colour work, and used a variety of fast films for my black and whites. There was something magical about picking up the film from my lab, laying the trimmed roll of slide film over the lightbox, and seeing the almost three dimensional quality that the photographs seemed to posses. And black and white contact sheets, well there’s something that I can’t quite put my finger on. I just love them. I could look at contact sheets all day, every day.

So when I made the move to digital photography I was keen to keep as much of this wonderful filmic aesthetic as possible. I do this both through the way I shoot, and the way I process. One of the important processing hurdles was how to replicate realistic film grain in my digital prints.

I’ve never been fond of ultra-crisp, clean and clinical digital photographs. To me, grain and movement add heart and soul to an image. As a result I tend to allow shutter speeds to slow sometimes, rather than blast the scene with flash to freeze any movement. And I regularly shoot at high ISO’s, even when I probably don’t really need to. 800 ISO is probably my most used speed. This adds some natural noise and texture into the image, breaking up the tones and roughening up the image a little. However, sometimes I need to drop the ISO as low as it will go, when shooting in bright sunshine for example. This is when my Film Grain action comes into play.

Recently I have started using the grain feature in Adobe Lightroom to enhance the grain in my photographs,
but
this tutorial focusses on my Photoshop action for adding Film Grain. This method is non-destructive.

Start with your flattened processed photograph.

Add a new Layer. Call this Layer Film Grain. Fill this Layer with 50% Gray.

Now go to Filter > Noise > Add Noise. Set the Amount to 10, Distribution to Gaussian and check the Monochromatic box. Click OK.

Next set the Layer Mode of this Layer to Overlay. This allows the image below to show through, adding the Grain Layer as a semi-transparent layer above it.

The next steps depend on the resolution of your photograph and the size of grain you are looking to add. For a 12 million pixel file with a medium sized grain I  do the following:

Go to Select > All. Then Edit > Transform > Scale. In the Menu Bar at the top of the Window type 120% in the Width and Height boxes.

Go to Select > All. Then Image > Crop.

Now go to Filter > Blur > Gaussian Blur. Set the Amount to 0.7 and click OK.

This will give your grain a nice, natural feel.

The next step is to get a little more grain into the light midtones and highlights.

Duplicate your Film Grain Layer and call this Highlight Grain.

Go to Select > Color Range. Set the Fuzziness to 50 and click OK. Now go to Layer > Layer Mask > Reveal Selection. This masks off the additional Highlight Grain Layer so that it only applies to the Extreme Midtones and Highlights.

You can now adjust the opacity of each Layer independently to achieve the level of grain you are looking for. If you want to add a coarser grain, you can duplicate either or both of these Layers to double the effect. I usually set the opacity of each layer to around 50% for colour film, and around 70% for black and white film.

One extra thing I like to then do, is to actually soften my original image slightly. Go to Filter > Blur > Gaussian Blur and set a Radius of 0.4. This just softens the hard edges of the photograph and helps to create that realistic filmic aesthetic.

And there you have it. You can download this action here Film Grain in Photoshop

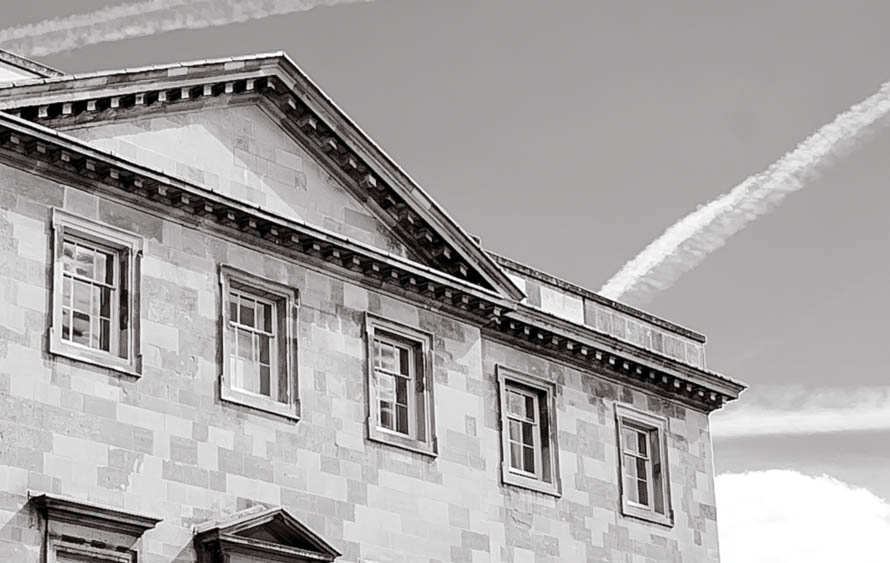
Before (100% crop):

Digital photograph without Realistic Film Grain

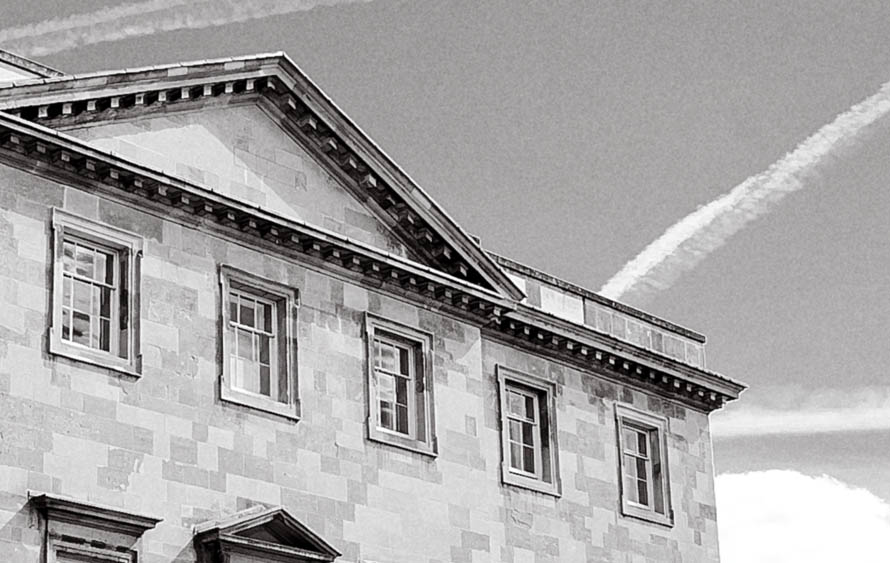
After (100% crop):

Digital photograph with Realistic Film Grain

I hope you found this useful.


Add a comment...

Your email is never published or shared. Required fields are marked *

If you would like to know more just fill in my contact form or ping me a quick WhatsApp. I'd love to find out more about your plans!

You can find me being sociable on all these lovely social networks